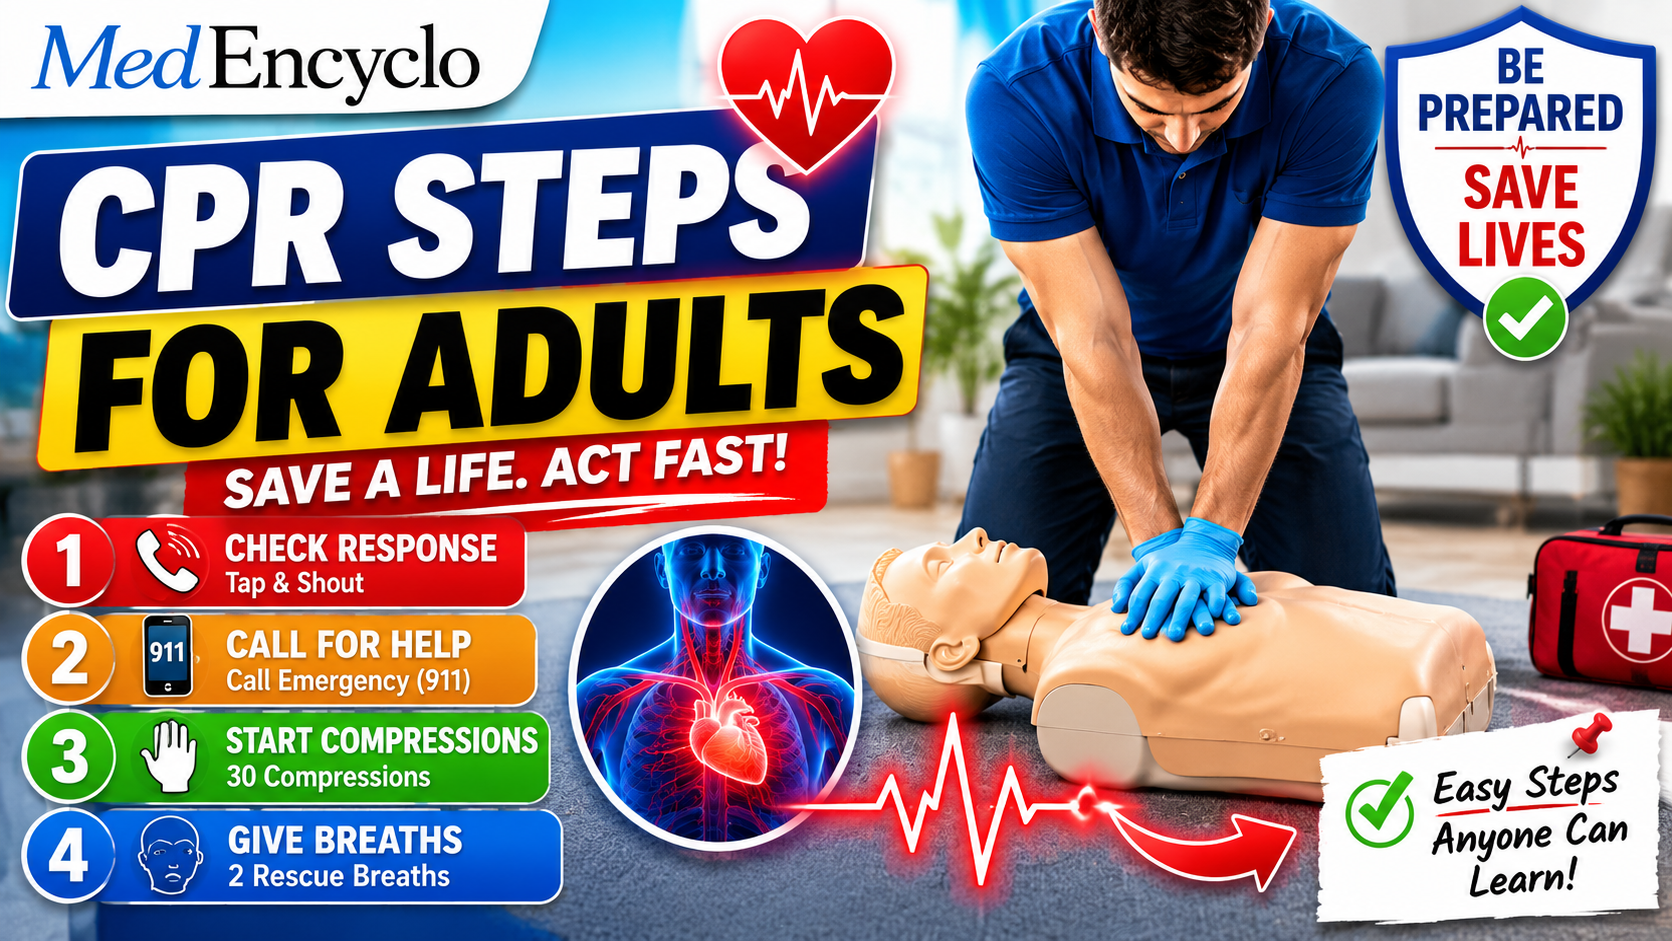
Imagine you are sitting at the dining table with your family, laughing and sharing a meal. Suddenly, your uncle gasps, clutches his chest, and slumps forward onto the floor, completely unresponsive. Your heart races, adrenaline surges, and seconds feel like agonizing hours. In this terrifying moment, the difference between tragedy and survival comes down to one thing: knowing the proper CPR Steps for Adults.
When a person suffers a sudden cardiac arrest, their heart stops pumping blood to the brain and other vital organs. Every single minute that passes without intervention reduces their chance of survival by nearly 10%. By stepping forward and performing immediate cardiopulmonary resuscitation, you act as their external heart, manually keeping oxygen-rich blood flowing to the brain until emergency medical professionals arrive. You do not need a medical degree to save a life; you just need the willingness to act and a clear understanding of this basic Adult CPR Guide. Let’s walk through this lifesaving process together, step by step, so you are always prepared to protect the people you care about most.
What Is CPR?
Cardiopulmonary Resuscitation, universally known as CPR, is an emergency medical procedure designed to manually keep a person’s blood circulating and oxygenated when their heart has stopped beating. It is the cornerstone of Basic Life Support (BLS) and serves as a temporary bridge that keeps brain tissue alive until advanced medical treatment can restore a natural cardiac rhythm.
The Breakdown of the Term
To truly understand the CPR Procedure, it helps to look at the words themselves:
- Cardio: Refers to the heart.
- Pulmonary: Refers to the lungs.
- Resuscitation: Means to revive or bring back to life.
The Core Purpose of CPR
When the heart stops, the lack of oxygenated blood can cause permanent brain damage in as little as 4 minutes, and brain death can occur within 8 to 10 minutes. CPR mimics the natural pumping action of the heart through chest compressions and supplies oxygen through rescue breaths.
The concept of modern resuscitation has ancient roots, but the formal method we use today was established in 1960 by Peter Safar and James Elam, who combined chest compressions with mouth-to-mouth rescue breathing. Today, global health organizations like the American Heart Association (AHA) and the European Resuscitation Council (ERC) constantly update these steps to make CPR for Beginners simple, effective, and memorable for everyday bystanders.
Why CPR Is Important
Sudden cardiac arrest is one of the leading causes of death worldwide. It can strike anyone, at any time—regardless of fitness level, age, or health history. In India alone, cardiovascular diseases account for a massive percentage of sudden natural deaths, yet a very small fraction of the population knows How to Perform CPR.
WITHOUT CPR: Survival drops by 10% every minute.
WITH IMMEDIATE CPR: Survival rates can double or triple.
Consider these critical facts about why early intervention is non-negotiable:
- The Brain Oxygen Timeline: The brain is a highly sensitive organ that relies entirely on a constant supply of oxygen. Within minutes of a cardiac arrest, brain cells begin to die. CPR manually pushes blood into the cerebral arteries, preserving neurological function.
- Bystander Intervention Limits Tragedy: Over 70% of cardiac arrests happen at home or in residential settings. If you are called upon to perform CPR, it is highly likely you will be saving a parent, spouse, child, or close coworker.
- Buying Vital Time: Emergency medical services (EMS) can take anywhere from 8 to 20 minutes to arrive, depending on traffic, infrastructure, and distance. High-quality CPR bridges this gap, keeping the patient viable for advanced life support interventions like defibrillation.
Understanding Cardiac Arrest vs Heart Attack
Many people use the terms “cardiac arrest” and “heart attack” interchangeably, but they are entirely different medical events. Understanding the distinction is vital because it changes how you respond, though a severe heart attack can ultimately lead to cardiac arrest.
- A Heart Attack is a “Plumbing” Problem: It occurs when a blood vessel feeding the heart muscle becomes blocked, starving a portion of the heart of oxygen. The person is usually conscious, breathing, and able to talk, but experiencing severe chest pain, sweating, or nausea.
- A Cardiac Arrest is an “Electrical” Problem: It occurs when the heart’s electrical system malfunctions, causing it to suddenly beat erratically or stop completely. The person collapses instantly, loses consciousness, and stops breathing normally. Emergency CPR Steps are required immediately for cardiac arrest, but not for a conscious heart attack patient.
Cardiac Arrest vs. Heart Attack Comparison
| Feature | Cardiac Arrest (Electrical Failure) | Heart Attack (Circulatory Blockage) |
| Primary Cause | Electrical malfunction causing the heart to stop beating. | Blocked artery cutting off blood flow to a section of the heart. |
| Consciousness | The person loses consciousness instantly. | The person remains conscious and awake. |
| Breathing | No breathing, or only occasional, abnormal agonal gasps. | The person is breathing, though it may be rapid or labored. |
| Primary Symptoms | Sudden collapse, unresponsiveness, no pulse. | Crushing chest pain, left arm pain, sweating, nausea, shortness of breath. |
| Is CPR Required? | Yes, absolutely mandatory. | No. Keep them calm, seated, and call for emergency help immediately. |
| Urgency Level | Extreme medical emergency (Immediate threat to life within minutes). | Severe medical emergency (Requires urgent hospitalization to prevent muscle damage). |
CPR Steps for Adults – Complete Step-by-Step Guide
If you see an adult collapse or find someone lying motionless on the ground, follow these precise, sequential instructions. This breakdown is optimized to serve as an accessible CPR Training Guide that you can visualize and memorize.
Step 1 – Ensure Scene Safety
Before you rush over to help, pause for a single second and look around. You cannot rescue anyone if you become a casualty yourself. Evaluate the environment for immediate hazards:
- Traffic: Are you on a busy road or highway?
- Fire or Smoke: Is there an active fire, threat of explosion, or toxic gas?
- Electricity: Are there downed power lines or exposed electrical wires near the victim?
- Water Hazards: Is the person submerged or lying in a deep pool of water? Move them to dry ground.
- Personal Safety: Look out for unstable structures, aggressive animals, or volatile crowds. If the scene is unsafe, stay back and call emergency services immediately.
Step 2 – Check Responsiveness
Once you are certain the area is secure, assess whether the person is conscious or unconscious.
Use the Tap and Shout method. Approach the person, kneel beside their shoulders, and firmly tap them on both collarbones or shake their shoulders gently. Shout loudly and clearly: “Sir! Are you okay?” or “Can you hear me?”
If they moan, open their eyes, move, or speak, they are responsive. If there is absolutely no movement, vocalization, or eye-opening, consider them completely unresponsive and proceed immediately to the next step.
Step 3 – Call Emergency Services
An unresponsive adult is an absolute emergency. You must activate advanced medical help right away.
- If you are alone: Pull out your mobile phone, dial your local emergency number, put the phone on speakerphone, and place it on the ground next to you so you can talk to the dispatcher while starting CPR.
- If there are bystanders: Point directly at a specific person, make eye contact, and command them clearly: “You in the blue shirt, call 112 immediately and tell them we have an unresponsive adult who is not breathing. Bring an AED if you can find one!”
Emergency Numbers to Remember:
- India: 112 (National Emergency Number) or 102 (Ambulance Services)
- United States / Canada: 911
- United Kingdom: 999
- Europe: 112
When speaking to the dispatcher, state your exact location, describe the condition of the patient clearly, and do not hang up until they tell you to do so.
Step 4 – Check Breathing
Position yourself so you can observe the person’s chest and face. Spend no more than 10 seconds checking for normal breathing using a focused assessment.
Look closely at the chest to see if it rises and falls naturally. Listen with your ear near their mouth for breath sounds, and feel for their breath against your cheek.
CRITICAL WARNING: AGONAL GASPS ARE NOT NORMAL BREATHING
In the first few minutes of cardiac arrest, a patient may make infrequent, heavy, snoring, or snorting gasps. This is a brainstem reflex, not functional breathing. If you see or hear agonal gasps, start CPR immediately.
If the person is not breathing, or is only gasping abnormally, they are in cardiac arrest. Do not waste time trying to feel for a pulse if you are an untrained bystander; proceed directly to chest compressions.
Step 5 – Position the Person Properly
For chest compressions to be effective, the heart must be compressed between the breastbone (sternum) and a rigid surface.
Carefully roll the person onto their back (supine position) if they are not already. Ensure they are lying on a hard, flat surface, such as a tiled floor, concrete walkway, or smooth ground. If they are on a soft bed or sofa, gently pull them down onto the floor, as compressions on a mattress will simply sink into the cushion without compressing the heart effectively. Clear away any loose clothing or debris around the upper body so you have unrestricted access to their chest.
Step 6 – Begin Chest Compressions
This is the most critical component of the entire CPR Steps for Adults routine. High-quality chest compressions keep blood circulating to vital organs.
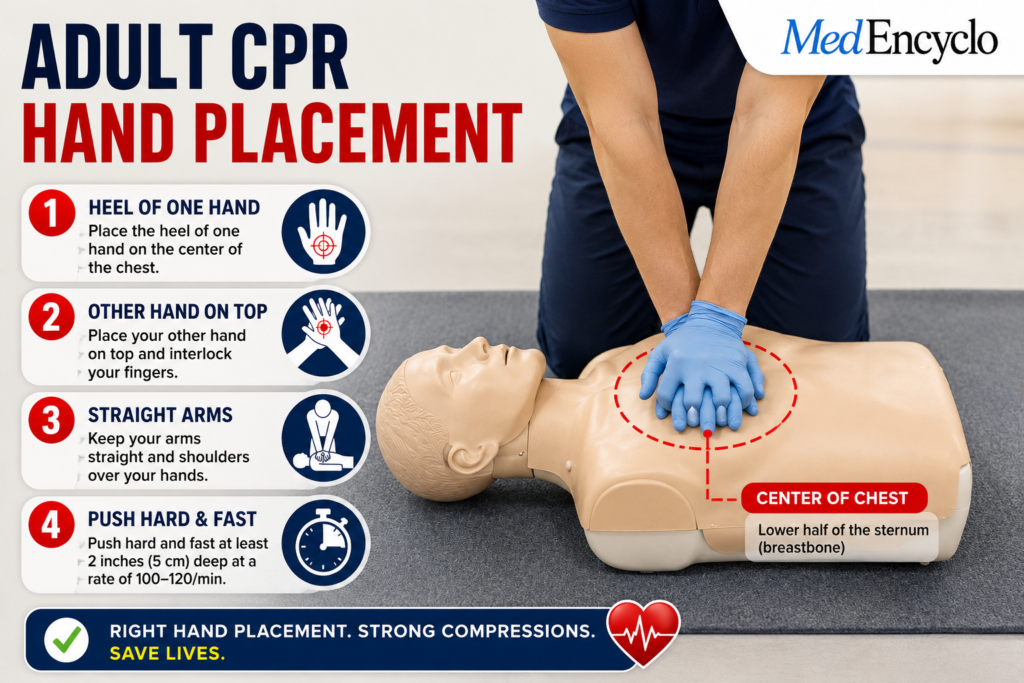
Hand Placement
Kneel firmly beside the person’s chest. Locate the center of their chest, which is the lower half of the breastbone (sternum). Place the heel of your dominant hand directly on this spot. Place your other hand directly on top of the first hand, interlocking your fingers. Pull your fingers upward slightly so that only the heel of your bottom hand is making direct contact with the breastbone. This concentrates your force and protects the ribs from direct lateral pressure.
Body Alignment
Position your body so that your shoulders are directly over your hands, and your arms are completely straight. Lock your elbows. Do not use your arm muscles to push; instead, use your upper body weight and pivot from your hips to drive the force straight down into the victim’s chest.
Compression Depth and Rate
- Compression Depth: Push down firmly and deeply, compressing the chest at least 5 to 6 cm (2 to 2.4 inches) for an adult.
- Compression Rate: Deliver compressions at a rapid CPR Compression Rate of 100 to 120 compressions per minute.
To maintain this precise rhythm in a real-world emergency, pump along to the beat of well-known songs that have a 100-120 BPM tempo, such as “Stayin’ Alive” by the Bee Gees, “Crazy in Love” by Beyoncé, or the classic Bollywood track “Dum Maro Dum”.
Full Chest Recoil
After every single downward push, allow the chest to fully return to its normal position. This is called full chest recoil. When you lift your weight off the chest (without letting your hands lose contact with the skin), it creates a negative vacuum inside the thoracic cavity, allowing the heart chambers to refill with blood before the next compression. If you lean on the chest or fail to let it rise completely, you drastically decrease the amount of blood pumped with each strike.
Step 7 – Open the Airway
If you are trained in full CPR and are prepared to give rescue breaths, you must open the person’s airway after completing 30 chest compressions.

Use the Head Tilt-Chin Lift maneuver. Place one hand flat on the person’s forehead and gently push backward. At the same time, place the index and middle fingers of your other hand under the bony point of their lower jaw and lift it upward. This simple motion lifts the tongue away from the back of the throat, creating an open, unobstructed pathway for air to enter the lungs.
Note: If you suspect a serious neck or spinal trauma, healthcare professionals use an alternative method called a Jaw Thrust without tilting the head, but for standard beginners, the Head Tilt-Chin Lift remains the primary recommendation.
Step 8 – Give Rescue Breaths
With the airway held open, prepare to deliver 2 rescue breaths.
COMPRESSION-TO-VENTILATION RATIO
30 Compressions : 2 Rescue Breaths
Pinched closed the soft part of the person’s nose using your thumb and index finger (the hand resting on their forehead). Take a normal breath of air, place your mouth completely over the person’s mouth, and create a tight, airtight seal.
Blow steadily into their mouth for exactly 1 second. As you blow, look out of the corner of your eye down at their chest. If the chest visibly rises, your breath has successfully entered the lungs. Take your mouth away, allow the chest to fall completely as they exhale naturally, and then deliver a second rescue breath for another 1 second.
If the chest does not rise on the first attempt, re-tilt the head, re-adjust the chin lift, and try one more time. Never delay compressions for more than 10 seconds trying to deliver breaths.
Step 9 – Continue CPR Cycles
Immediately move your hands back to the center of the chest and resume chest compressions.
Continue alternating between 30 chest compressions and 2 rescue breaths (a 30:2 ratio). Maintain a steady, unhurried, yet rapid rhythm, and keep interruptions to an absolute minimum.
If someone else is on the scene with you, swap roles every 2 minutes (about 5 full cycles of 30:2). Performing compressions is physically exhausting; your energy will decline after 2 minutes, making your compressions shallow and less effective. A quick, well-coordinated 5-second switch ensures high-quality CPR remains consistent.
Step 10 – Continue Until Help Arrives
You must keep performing these cycles of CPR continuously. Do not stop unless one of these five specific events occurs:
- Professional medical help arrives and explicitly takes over care of the person.
- An AED becomes available and is ready to analyze the person’s heart rhythm.
- The person shows clear, unambiguous signs of life (waking up, moving purposefully, coughing, or breathing normally).
- The environment becomes completely unsafe, forcing you to evacuate.
- You become utterly exhausted and physically incapable of continuing.
Hands-Only CPR Steps for Adults
If you have never attended a formal, hands-on CPR Training Guide course, or if you feel uncomfortable performing mouth-to-mouth rescue breathing on a stranger due to health or hygiene concerns, you should perform Hands-Only CPR.
What Is Hands-Only CPR?
Hands-Only CPR is chest compression-only resuscitation. Studies supported by global cardiac bodies have shown that during the first few minutes of sudden cardiac arrest, the adult’s blood and lungs still contain a reservoir of residual oxygen. Pumping the chest continuously is sufficient to keep that remaining oxygen circulating to vital neurological zones.
Benefits and Limitations
- Benefits: It eliminates the fear of disease transmission, removes the complexity of coordinating breaths, and can be easily guided over the phone by emergency dispatchers. It is highly effective for primary cardiac events.
- Limitations: It is less effective for long-term arrests, drowning incidents, drug overdoses, or respiratory failures where the oxygen in the bloodstream has already been depleted before the heart stopped.
How to Perform Hands-Only CPR
- Call Emergency Services: Ensure the scene is safe, confirm unresponsiveness, and call your national emergency number (e.g., 112 or 911).
- Position Hands: Place both hands interlocked in the center of the chest.
- Push Hard and Fast: Compress the chest deep (5 to 6 cm) and fast (100 to 120 beats per minute) without pausing for breaths. Keep going until medical personnel relieve you.
CPR Steps for Adults Using an AED
An Automated External Defibrillator (AED) is a smart, portable electronic device that can automatically analyze a victim’s heart rhythm and deliver a targeted electrical shock (defibrillation) to help reset a heart experiencing chaotic electrical failure.
What is an AED?
An AED is designed for public use by complete novices. It features built-in voice prompts that tell you exactly what to do step by step. Finding and using an AED alongside standard Emergency CPR Steps drastically improves survival rates from less than 10% to upwards of 50-70%.
Step-by-Step Guide to Operating an AED
1. Turn on the Device
As soon as an AED is brought to the scene, open the case and turn it on. Some units turn on with a power button, while others activate automatically when you open the lid. Listen carefully to the voice commands.
2. Apply the Pads
Expose the patient’s bare chest. Wipe away any moisture or sweat with a dry towel. Open the sealed adhesive electrode pads. Look at the visual diagrams printed directly on the back of the pads.
- Place the first pad on the upper right side of the chest, just below the collarbone.
- Place the second pad on the lower left side of the chest, a few inches below the armpit.
3. Analyze the Rhythm
Plug the pad connector cable directly into the main AED unit if it isn’t already pre-connected. The device will state: “Analyzing heart rhythm. Do not touch the patient.” Ensure that nobody is touching or jostling the victim during this window, as movement can disrupt the electrical reading.
4. Deliver the Shock (If Advised)
- If a shock is advised: The AED will automatically charge its internal capacitor and flash a bright button. The voice prompt will state: “Shock advised. Stand clear.” Loudly shout, “Clear!” Look up and down the patient to make absolutely sure no one is in contact with them, then press the orange, flashing Shock button.
- If no shock is advised: The device will tell you it is safe to touch the patient and command you to resume chest compressions immediately.
5. Resume CPR
Immediately after the shock is delivered (or if no shock is advised), do not remove the pads. Leave them in place and immediately start high-quality chest compressions. The AED will track the time and automatically prompt you to pause for another analysis every 2 minutes.
CPR Steps for Adults in Special Situations
Not every medical emergency unfolds under perfect textbook conditions. As an expert healthcare educator, I recommend tailoring your CPR Procedure slightly based on these special demographic conditions.
Drowning Victims
In a drowning situation, the primary cause of cardiac arrest is severe oxygen deprivation (hypoxia), not an intrinsic cardiac electrical failure. Therefore, you should not perform Hands-Only CPR.
- Get the person out of the water onto a firm surface.
- Open the airway and deliver 5 initial rescue breaths first to get oxygen into their water-logged lungs.
- Immediately follow this with the standard cycle of 30 compressions and 2 breaths.
Pregnant Women
When an advanced-stage pregnant woman lies flat on her back, the heavy weight of the uterus compresses the inferior vena cava—the massive vein running up the right side of the spine that returns blood to the heart. This drastically lowers the effectiveness of your compressions.
- Perform chest compressions slightly higher up on the breastbone than normal.
- If extra bystanders are around, have someone gently push the woman’s pregnant abdomen toward her left side (called Left Lateral Uterine Displacement) while you perform standard chest compressions on her back.
Elderly Adults
Geriatric individuals have brittle, fragile bones and calcified cartilage. When you deliver a proper 5 to 6 cm deep compression, you may feel or hear cracking, popping, or breaking ribs.
- Do not stop or lessen your depth. Broken ribs heal; brain death from a lack of oxygen is permanent.
- Ensure your hand placement remains centered on the sternum, rather than slipping out onto the ribcage, to minimize unnecessary structural fracture.
Trauma Victims
If an adult has suffered severe trauma (such as a major car crash or a fall from a height), assume they have a cervical spinal cord injury.
- Avoid aggressive head-tilting if possible. Try to open the airway using a gentle chin lift without extending the neck backward.
- Prioritize continuous chest compressions to maintain systemic blood pressure.
Choking Leading to Collapse
If an adult is choking on a foreign object (like a piece of meat) and suddenly loses consciousness:
- Carefully lower them to the ground and call for emergency help.
- Begin chest compressions immediately.
- Each time you open the airway to give rescue breaths, look inside their mouth. If you see the foreign object clearly, sweep it out carefully with your finger. Never perform a blind finger sweep, as you might push the object deeper down their throat.
Suspected Respiratory Infections
During global public health concerns involving airborne pathogens, precautions are necessary to safeguard rescuers.
- If you do not have a protective pocket mask with a one-way viral filter, do not perform mouth-to-mouth resuscitation.
- Place a cloth, face mask, or light towel over the patient’s mouth and nose to prevent aerosols from escaping into the room, and perform continuous Hands-Only CPR.
CPR Compression Depth and Rate Explained
To truly understand how to save a life, let’s explore the medical physics behind why specific depths and rates are mandated.
                           THE CARDIOVASCULAR PHYSICS OF CPR
COMPRESSION DEPTH (5-6 cm)        |        COMPRESSION RATE (100-120 BPM)
Squeezes the heart ventricles            |         Builds up high enough pressure
enough to forcefully eject blood       |         to continuously perfuse the brain
into the brain and vital organs.          |         and coronary arteries.
If your compressions are too shallow (less than 5 cm), you are merely pressing down on surface fat and muscle tissues without physically squishing the cardiac ventricles beneath the sternum. This fails to generate enough internal pressure to move blood forward into the systemic arterial network.
Conversely, if your compressions are excessively deep (greater than 6 cm), you risk causing structural internal damage, such as puncturing a lung, lacerating the liver, or tearing major vascular pathways within the thoracic cavity.
The speed matters just as much. If you compress too slowly (under 100 BPM), you cannot maintain the constant, foundational arterial pressure required to force blood upward against gravity into the cerebral arteries. If you compress too fast (over 120 BPM), you are moving your hands so rapidly that the chest does not have enough time to bounce back up, meaning the heart never fully fills with blood before the next strike.
Common CPR Mistakes Beginners Make
When adrenaline takes over during an emergency, it is easy to fall into bad physical habits. Review this list carefully so you can consciously avoid these errors:
- Leaning on the Chest: Keeping your body weight pressed down on the patient’s chest during the upward phase of your compressions. This stops the heart from expanding and refilling with blood. Always lift your body weight off completely.
- Bending the Elbows: Pumping with your arms instead of using your hips and upper body weight. This causes your arm muscles to fatigue within 30 to 45 seconds, making your subsequent compressions shallow and useless.
- Excessive Interruptions: Pausing compressions to check for a pulse, look for signs of breathing, or adjust clothes. Every time you lift your hands away, the arterial pressure drops to zero instantly. Keep your hands moving.
- Improper Hand Alignment: Allowing your hands to drift down toward the soft abdomen (the xiphoid process) or sideways onto the ribs. Pushing the xiphoid process down can snap it off, driving it directly into the liver or stomach.
- Inadequate Airway Management: Forgetting to tilt the head back far enough before blowing. If the neck is flat, your rescue breaths will simply go straight down into the stomach, causing gastric inflation and vomiting instead of inflating the lungs.
When Not to Perform CPR
CPR is an intensive, invasive intervention meant exclusively for individuals whose biological systems have shut down. You should not begin CPR if any of the following parameters are present:
- The Person Is Conscious or Responsive: If they are talking, coughing, blinking, or responding to your voice, their heart is beating fine.
- The Person is Breathing Normally: If they are unconscious but breathing steadily, smoothly, and naturally, do not compress their chest. Instead, place them in the protective Recovery Position and monitor them closely.
- Extreme Threat to Life: If entering the environment to reach the person exposes you to toxic chemical spills, live wires, active gunfire, or a collapsing building structure.
- Obvious Signs of Death: If the individual exhibits clear, irreversible physical indicators of death, such as decapitation, rigor mortis (stiffening of the body), or dependent lividity (blood pooling in the lowest parts of the body).
- Valid Legal Documents: If the patient has an explicit, legally binding, state-approved “Do Not Resuscitate” (DNR) order or Living Will present and verified at the scene.
What Happens After Successful CPR?
If you perform high-quality CPR and are fortunate enough to witness a return of spontaneous circulation (ROSC)—meaning the person’s heart restarts, and they begin breathing on their own—your job isn’t finished.
- Stop Compressions: Stop pressing on their chest immediately. Leave the AED pads firmly attached to their skin; the device needs to keep tracking their rhythm in case they collapse again.
- Transition to the Recovery Position: If they remain unconscious but are breathing normally, roll them into the lateral recovery position. This keeps their tongue forward and ensures that if they vomit, the fluids drain out of their mouth rather than down into their windpipe.
- Continuous Monitoring: Stay right beside them. Count their breaths, check their responsiveness, and be ready to flip them back onto their back and resume chest compressions instantly if their breathing stops again.
- Handover to EMS: When paramedics arrive, provide a clear summary: “He collapsed 6 minutes ago. I performed CPR for 4 minutes and used an AED which delivered 1 shock. He started breathing on his own 1 minute ago.”
Recovery Position Explained
The recovery position is a safe, stable side-lying posture for an unconscious adult who is breathing normally. It uses the person’s own limbs to lock their body into a comfortable, secure position that protects their airway.
Step-by-Step Instructions
- Align the Arms: Kneel beside the person. Take the arm closest to you and place it straight out at a right angle to their body, palm facing upward.
- Cross the Chest: Take their other arm (the one furthest from you) and bring it across their chest. Place the back of their hand flat against the cheek closest to you. Hold it there.
- Bend the Knee: Use your other hand to reach across and grab the leg furthest from you, pulling their knee up so their foot rests flat on the ground.
- Roll Toward You: Gently pull on that bent knee to roll the person’s entire body onto their side, facing toward you.
- Adjust the Head: Tilt their head back slightly to ensure their airway remains open. Rest their face gently on the back of their hand like a pillow. Ensure the top leg is bent at a 90-degree angle at both the hip and knee to anchor them securely on their side.
CPR Certification and Training
Reading this guide is a fantastic first step toward emergency preparedness, but it cannot replace the immersive benefit of physical training.
In a formal classroom setting, you will practice pushing down on specialized feedback manikins that click when you reach the correct depth, allowing your muscle memory to lock in the exact force required. You will also practice handling real training AEDs and receive direct coaching from certified professionals.
RECOMMENDED COURSES FOR BEGINNERS:
* Heartsaver CPR AED (AHA)
* Basic First Aid & CPR (Indian Red Cross Society)
Look for accredited training programs in your local community through organizations like the American Heart Association (AHA), the Indian Red Cross Society, or the St. John Ambulance association. Most standard certifications are valid for two years. Because CPR physical skills degrade over time, taking regular refresher classes ensures you retain the technical competence and mental confidence needed to act effectively when a real-life crisis occurs.
Frequently Asked Questions (FAQ)
What is the first step in CPR?
The very first step before doing anything else is to check for scene safety. You must ensure that the area around the victim is completely free of immediate dangers like fire, traffic, water, or live electricity before you approach to give aid.
How hard should chest compressions be?
For an adult, you must press down firmly and with significant force, compressing the breastbone to a depth of at least 5 to 6 cm (2 to 2.4 inches). This requires you to lock your elbows and use your full upper body weight, not just your arm strength.
Can CPR restart the heart?
CPR itself rarely restarts a stopped heart completely. The primary goal of CPR is to manually pump oxygenated blood to the brain to keep it alive. Restoring a normal, functional heart rhythm usually requires an electrical shock from an AED or advanced cardiac medications administered by paramedics.
What if I break a patient’s rib during compressions?
Fracturing ribs or cartilage is a very common side effect of performing high-quality CPR, especially in older adults. If you hear a pop or crack, do not stop. A broken rib can heal with rest, but a brain deprived of oxygen will die within minutes. Saving their life is the absolute priority.
Can an untrained person perform CPR?
Yes, absolutely. If you have no formal training, emergency dispatchers over the phone can walk you through Hands-Only CPR. Pushing hard and fast in the center of the chest is far better than doing nothing at all, and it can save a life.
How long should CPR continue?
CPR should be performed continuously until advanced medical professionals arrive and take over, an AED is ready to analyze the rhythm, the patient begins breathing normally on their own, or you become completely exhausted and unable to physically continue.
Is mouth-to-mouth resuscitation required for adult victims?
No, it is not mandatory for bystanders. If you are untrained, do not have a protective barrier mask, or feel uncomfortable performing rescue breaths, you can perform Hands-Only CPR (continuous chest compressions at 100-120 BPM). It is highly effective during the first few minutes of a sudden cardiac arrest.
Can I be sued for performing CPR if something goes wrong?
In most parts of the world, including India (under the Good Samaritan guidelines established by the Supreme Court) and countries with explicit Good Samaritan Laws, bystanders who provide voluntary emergency assistance in good faith are legally protected from civil and criminal liability.
How do I know if someone needs CPR?
An adult requires CPR if they meet two simple criteria: they are completely unresponsive (do not wake up, move, or respond when you tap and shout), and they are not breathing normally (either not breathing at all or only making sporadic, gasping agonal noises).
What is the exact compression-to-breath ratio for an adult?
The standard internationally accepted ratio for adult CPR is 30 chest compressions followed by 2 rescue breaths. This 30:2 cycle is repeated continuously until medical personnel arrive.
Should I move the patient to a bed before doing CPR?
No. Never perform CPR on a soft surface like a mattress, couch, or car seat. The soft cushions will absorb your compression force, meaning you won’t compress the heart effectively against the spine. Keep or move the patient onto a hard, flat floor or ground.
What should I do if the person vomits during CPR?
If the patient vomits, immediately turn their entire body onto their side to let the fluids drain out of their mouth freely. Clean out their mouth using a cloth or your fingers if necessary, roll them back onto their back, and immediately resume chest compressions.
Quick CPR Steps for Adults Checklist
Keep this summary table handy as a quick reference tool to periodically refresh your memory on the correct emergency actions.
| Step | Action | Key Focus | Target Metric |
| 1 | Check Scene Safety | Look for traffic, electrical hazards, fire, or water. | Immediate 360° scan |
| 2 | Check Responsiveness | Tap both shoulders firmly and shout loudly. | 2–3 seconds |
| 3 | Call Emergency Help | Dial 112 (India) or 911 (US). Put phone on speaker. | Act immediately |
| 4 | Check Breathing | Look for chest rise; ignore agonal gasps. | Maximum 10 seconds |
| 5 | Position the Victim | Place flat on a hard, solid surface (floor or ground). | Avoid soft mattresses |
| 6 | Begin Compressions | Place heel of hand on center of chest. Lock elbows. | 100–120 BPM / 5–6 cm depth |
| 7 | Open the Airway | Perform Head Tilt-Chin Lift technique. | Clear tongue from throat |
| 8 | Give Rescue Breaths | Pinch nose, seal mouth, blow until chest rises. | 2 breaths (1 second each) |
| 9 | Repeat the Cycles | Keep a steady rhythm of compressions and breaths. | 30:2 ratio |
| 10 | Deploy an AED | Turn on the unit, apply pads, and follow voice prompts. | Minimize CPR pauses |
Summary: Be the Difference Between Life and Death
When an adult suffers a sudden cardiac arrest, they are entirely dependent on the immediate action of whoever is standing closest to them. It is natural to feel anxious, hesitant, or afraid of making a mistake. However, the only real mistake you can make in a cardiac emergency is choosing to do nothing at all.
By remembering these simple CPR Steps for Adults—checking safety, calling for help, and pushing hard and fast in the center of the chest—you hold the power to give a fellow human being, a colleague, or a family member a second chance at life. Stay prepared, stay calm, and carry this knowledge with confidence.
“This content is for informational and educational purposes only and is not intended as medical advice, diagnosis, or treatment. Always consult a qualified healthcare professional before making any medical decisions.”